Automating Image Deployment with Flux
Prerequisites
Before diving into the specifics of automating image deployment with Flux, it is essential to have a basic understanding of how Flux operates within a Kubernetes environment. If you are new to Flux, begin by setting up Flux in your Cluster.
To follow along with this tutorial, you can clone the repository, which includes all necessary files expect the bootstraped flux manifests:
git clone https://github.com/x-cellent/Flux-Developerguide
cd Flux-Developerguide
We will use Github Image Registry for this.
Extending Flux Functionality
Remember how we used Flux for deployments? Let’s supercharge it! Run this command to enable automatic image updates:
flux bootstrap github \
  --token-auth \
  --components-extra=image-reflector-controller,image-automation-controller  \
  --owner=$GITHUB_USER \
  --repository=your-repository-name \
  --branch=master \
  --path=manifests \
  --personal # (just needed if it's your personal GitHub account)
With the additional components image-reflector-controller and image-automation-controller, Flux gains the ability to manage image updates automatically.
Configuration Files
In order to use the Github Container Registry you have to create a CI, that packages your application in a docker image, which is then pushed to the registry. Getting into specifics of the CI is out of scope for this tutorial, for the full CI refer to the Repository linked at the top of the guide.
To better understand how the GitHub Container Registry works, you can refer to the GitHub Packages Documentation.
Create a Secret to Access the Image Registry
export DOCKER_USERNAME=<your-username>
export DOCKER_PASSWORD=<your-token> # This is the token you created in the last tutorial
kubectl create secret docker-registry ghcr-secret \
  --namespace web \
  --docker-server=ghcr.io  \
  --docker-username=$DOCKER_USERNAME \
  --docker-password=$DOCKER_PASSWORD
Create a new secret for the Flux Bot
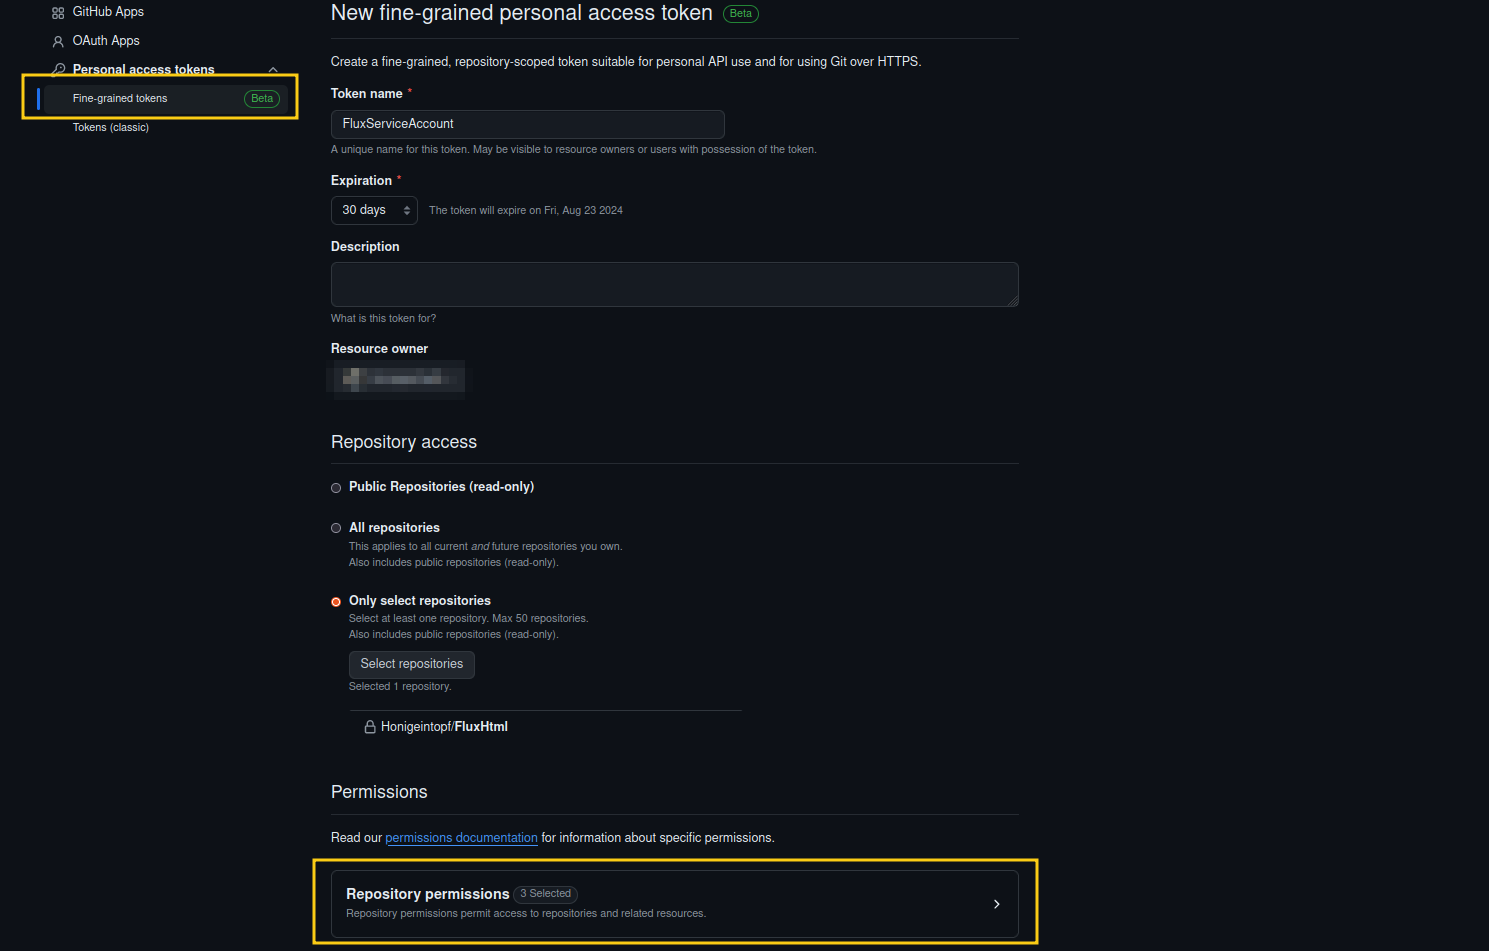
Now we also have to create a secret so the Flux bot can commit to the repository. For that we will create a Fine Grained Token with the following permissions. Be sure to save your token, as you’ll need it for the next step.
- Administration -> Access: Read-only
- Contents -> Access: Read and write
- Metadata -> Access: Read-only
Create Git Secret and Repository
Create the secret with the token you created in the last step and your Github username.
kubectl create secret generic git-secret \
--from-literal=username=your-github-username \
--from-literal=password=your-token -n web
Now also add a new yaml to your manifest, this will be used to define which Git Repository the Flux bot will work with.
apiVersion: source.toolkit.fluxcd.io/v1beta2
kind: GitRepository
metadata:
  name: app-repo
  namespace: web
spec:
  interval: 1m
  url: https://github.com/your-github-username/repository-name.git
  ref:
    branch: main
  secretRef:
    name: git-secret
ImageRepository Configuration
Create a YAML file in the manifests folder to define the image repository, if the repository is private you need to add the secretRef.
apiVersion: image.toolkit.fluxcd.io/v1beta2
kind: ImageRepository
metadata:
  name: app-image
  namespace: web
spec:
  image: ghcr.io/your-github-username/packagename
  # For example if your username is testUser and the package is testPackage ghcr.io/testUser/testPackage
  interval: 5m
  secretRef:
    name: ghcr-secret
ImagePolicy Configuration
This configuration determines which images to pull based on specified filters. In this example, we pull the latest image using its timestamp. Ensure your pipeline tags the images appropriately when pushing them to the repository. For more details on filtering images, refer to the Flux documentation.
apiVersion: image.toolkit.fluxcd.io/v1beta2
kind: ImagePolicy
metadata:
  name: app-policy
  namespace: web
spec:
  imageRepositoryRef:
    name: app-image
  filterTags:
    pattern: '^(?P<timestamp>.*)'
    extract: '$timestamp'
  policy:
    numerical:
      order: asc
ImageUpdateAutomation Configuration
Here you can define how often the controller should check for new images.
apiVersion: image.toolkit.fluxcd.io/v1beta2
kind: ImageUpdateAutomation
metadata:
  name: app-auto
  namespace: web
spec:
  interval: 5m
  sourceRef:
    kind: GitRepository
    name: app-repo
  git:
    commit:
      author:
        email: fluxcdbot@users.noreply.github.com
        name: fluxcdbot
    push:
      branch: main
  update:
    path: './'
    strategy: Setter
Adjust deployment to use newest Image
To ensure our deployment always uses the newest image, we need to add an annotation to the container image specification.
apiVersion: apps/v1
kind: Deployment
metadata:
  name: app
  namespace: web
spec:
  replicas: 2
  selector:
    matchLabels:
      app: app
  template:
    metadata:
      labels:
        app: app
    spec:
      imagePullSecrets:
        - name: ghcr-secret
      containers:
        - name: app
          image: ${IMAGE_REPOSITORY_URL}:2123 # {"$imagepolicy": "web:app-policy"}
          ports:
            - containerPort: 80
Check if everything is running
Use the following commands to verify that the resources are created and running correctly in your Kubernetes cluster:
kubectl get imagerepository app-image -n web
kubectl get imagepolicy app-policy -n web
kubectl get imageupdateautomation app-auto -n web
Expected Output
NAME          LAST SCAN              TAGS
app-image     2024-07-03T12:45:03Z   58

NAME          LATESTIMAGE
app-policy    ${IMAGE_REPOSITORY_URL}:20240703124016

NAME          LAST RUN
app-auto      2024-07-03T12:48:55Z
- app-image: Shows the last scan time and the number of tags found.
- app-policy: Displays the latest image that matches the policy’s criteria.
- app-auto: Indicates the last time the automation checked for new images.
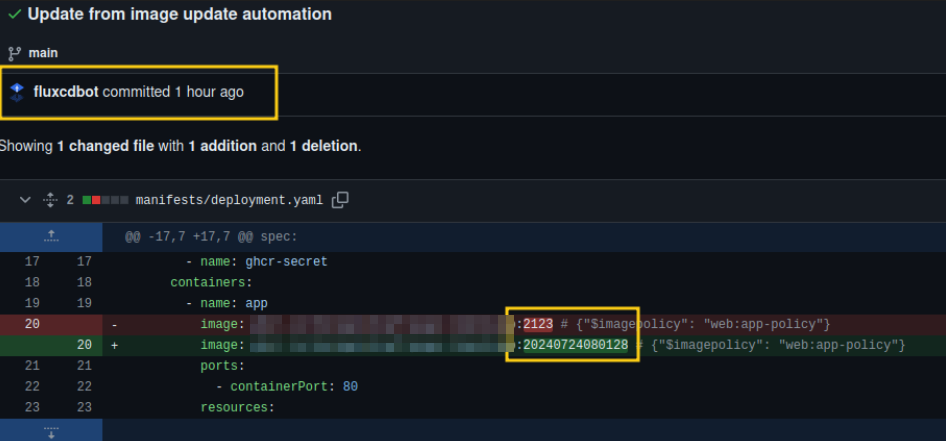
Conclusion
Now every time a new image is built and pushed to the package of the repository you can see that Flux changes the tag of the deployment, which in return updates the manifests and updates the cluster.